Our All Access subscription has moved to an incredible, new platform! With new technology comes adjustment, so I thought it would be pertinent to explain how the new platform was designed with teachers who are lesson planning (and very busy) in mind!
The New Platform is Search-Friendly
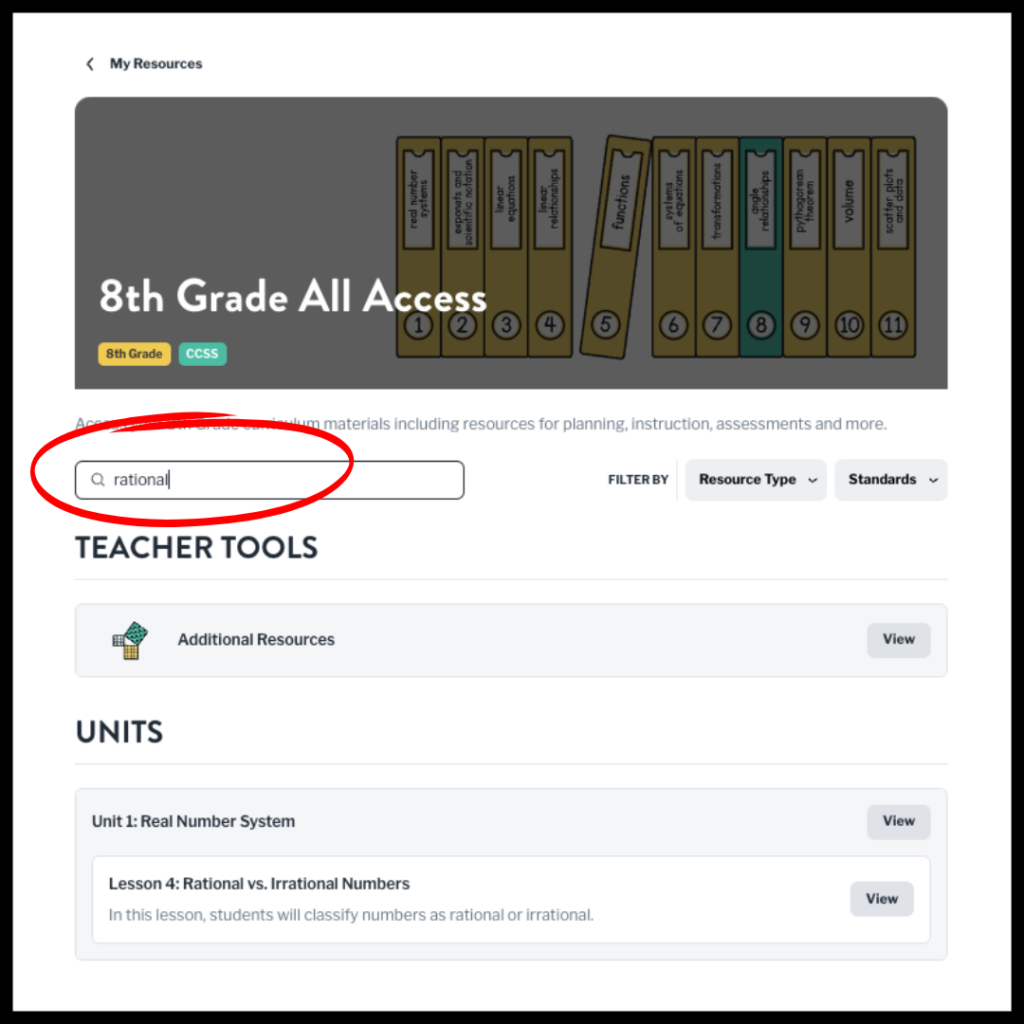
The new platform is much more user-friendly! Gone are the days of opening several tabs or previewing a bunch of different PDFs to find the topic you are looking for.
Now you can search an entire grade-level curriculum for a standard, a topic, or by resource type. If your district follows a different scope and sequence, this is especially helpful navigating where certain standards are located within our existing units.
Step 1: Find What You Need
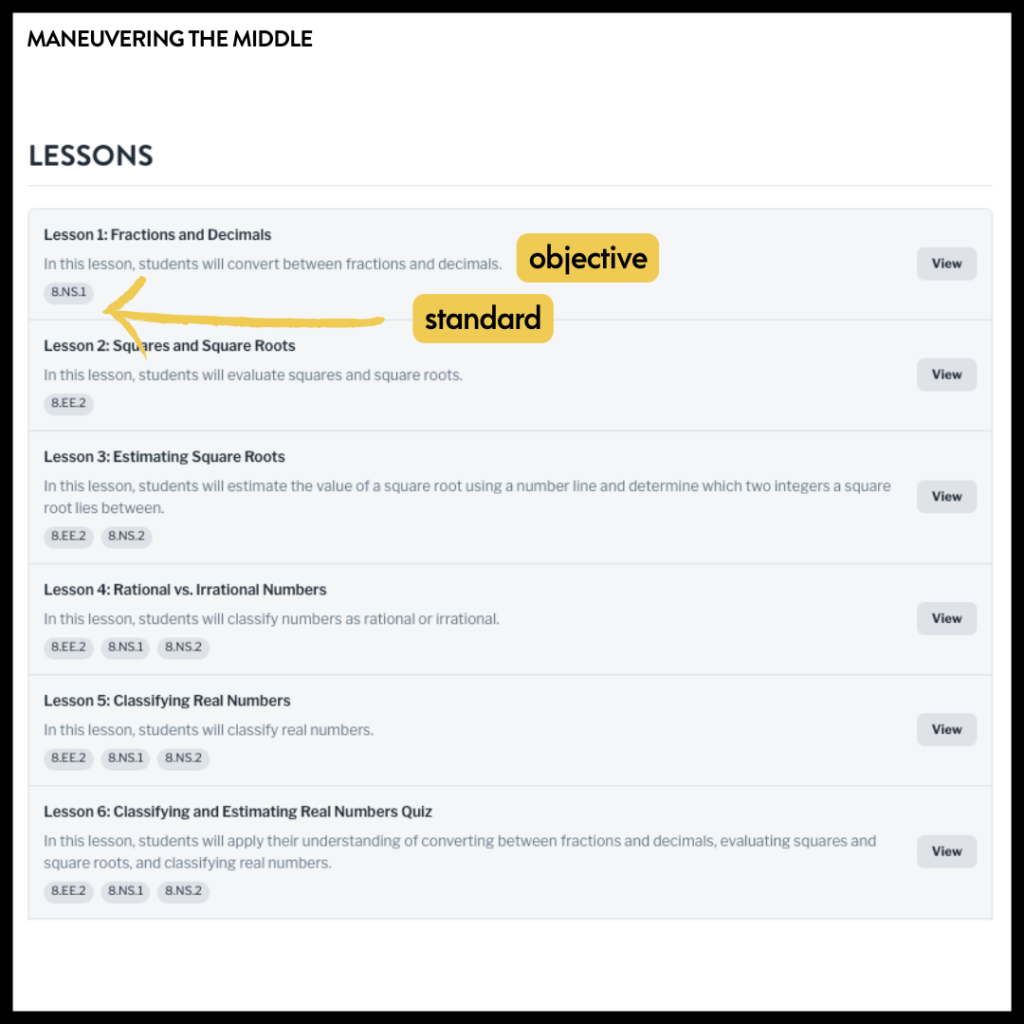
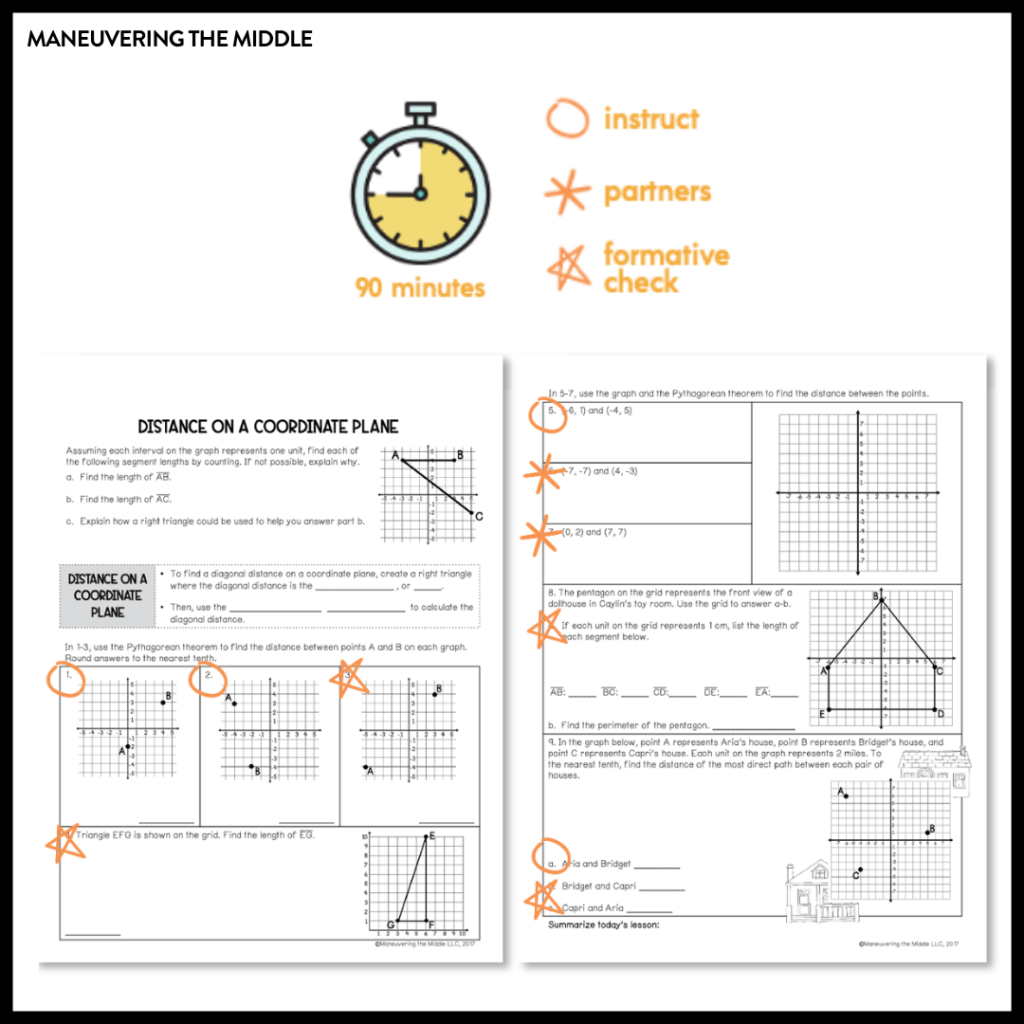
For writing a lesson plan (click here to grab a free lesson planning template), most of the typical lesson planning needs can be found within the Unit page. Once you are inside a unit, you will see a list of all of the lessons listed. Each lesson includes an objective and the standard for their respective lesson.
I worked at 3 different schools in my time as a teacher, and they all had different requirements for what to include in a lesson plan. There is not a one-size fits all approach to lesson planning, similar to how there is not a one-size fits all approach to teaching and learning math.
Step 2: Familiarize Yourself with the Student Handouts
Therefore, I am going to focus next on what prepares me the most to teach a lesson: working through the student handouts! Student handouts are the guided notes that the teacher will use as their foundation for instruction. When designing the student handouts, our curriculum team prioritizes that they are attainable, standards-based, rich in real-world application, and can be flexible in implementation. (3 examples of how 3 different teachers use our student handouts coming up – keep reading)
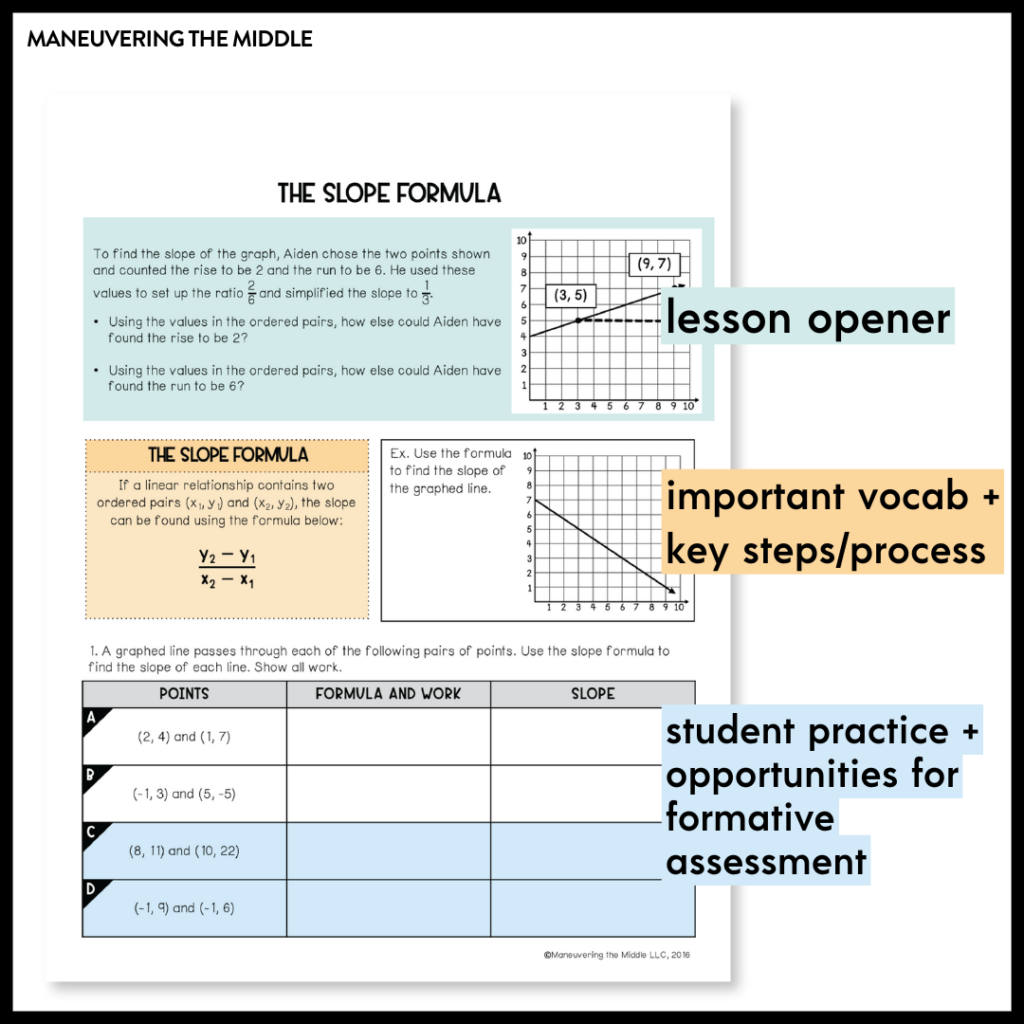
Each student handout contains:
- Lesson Opener (when applicable) – increase student engagement, make connections to prior knowledge or introduce a new concept through a relevant situation
- Vocabulary and Key Points (when applicable) – this section allows students to go back to the key vocabulary and mathematical processes. Any steps and language included are intentionally student-friendly to better support ESL and special populations
- Scaffolded Problems – problems are going increase in rigor as problems move from skill-based to application-based
- Integrated Application Problems – connections to the real-world whenever possible
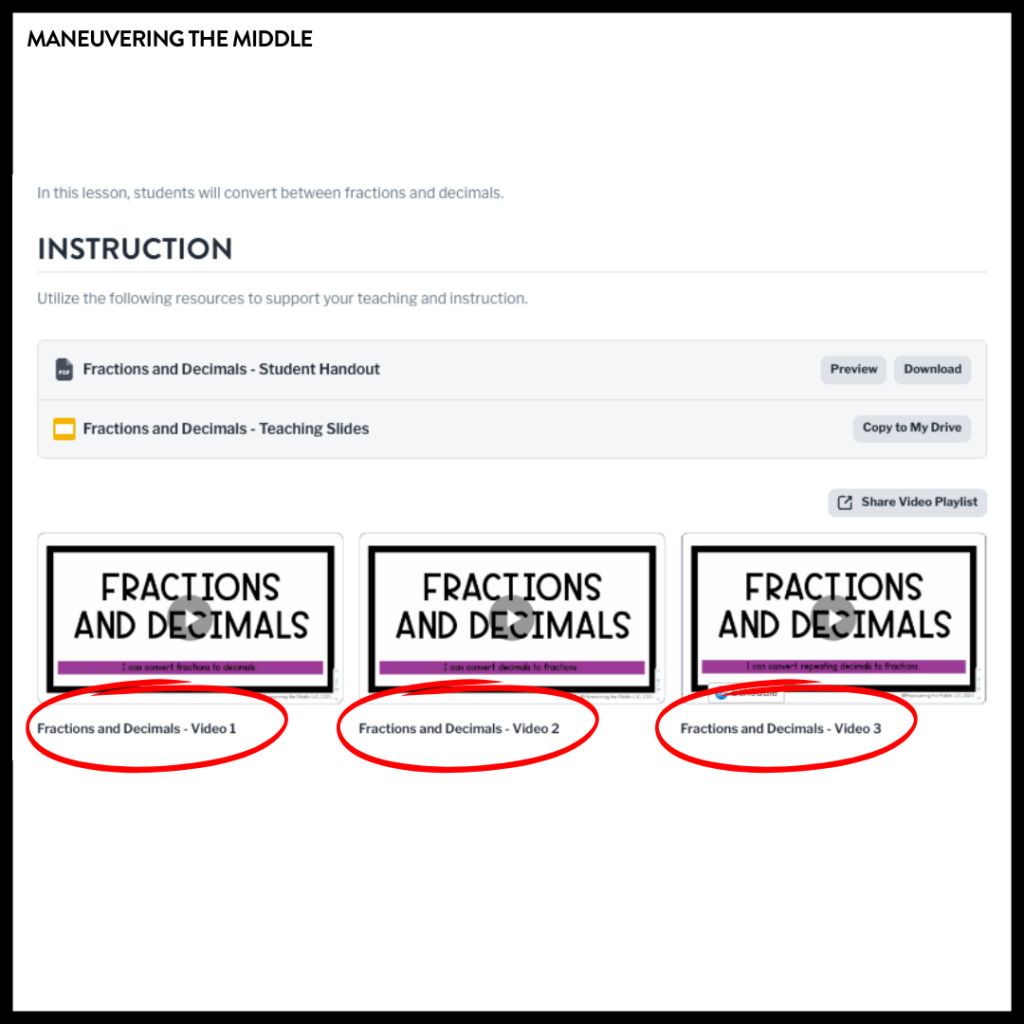
If you are a new teacher or just want a second opinion on how a skill can be taught, then definitely check out the instructional videos that are aligned to the corresponding student handout. They are located right below the student handout and can be previewed within the same window.
While you are working through the student handout, I would focus on a few things:
- What problems are you going to model and think aloud?
- What problems are you going to ask questions as you solve them?
- What questions are you going to ask during those problems?
- What problems can be checkpoints either with a partner or independently? When will you circulate the room to monitor students’ understanding and offer feedback? These problems can also be exit tickets.
- What problems can be removed?
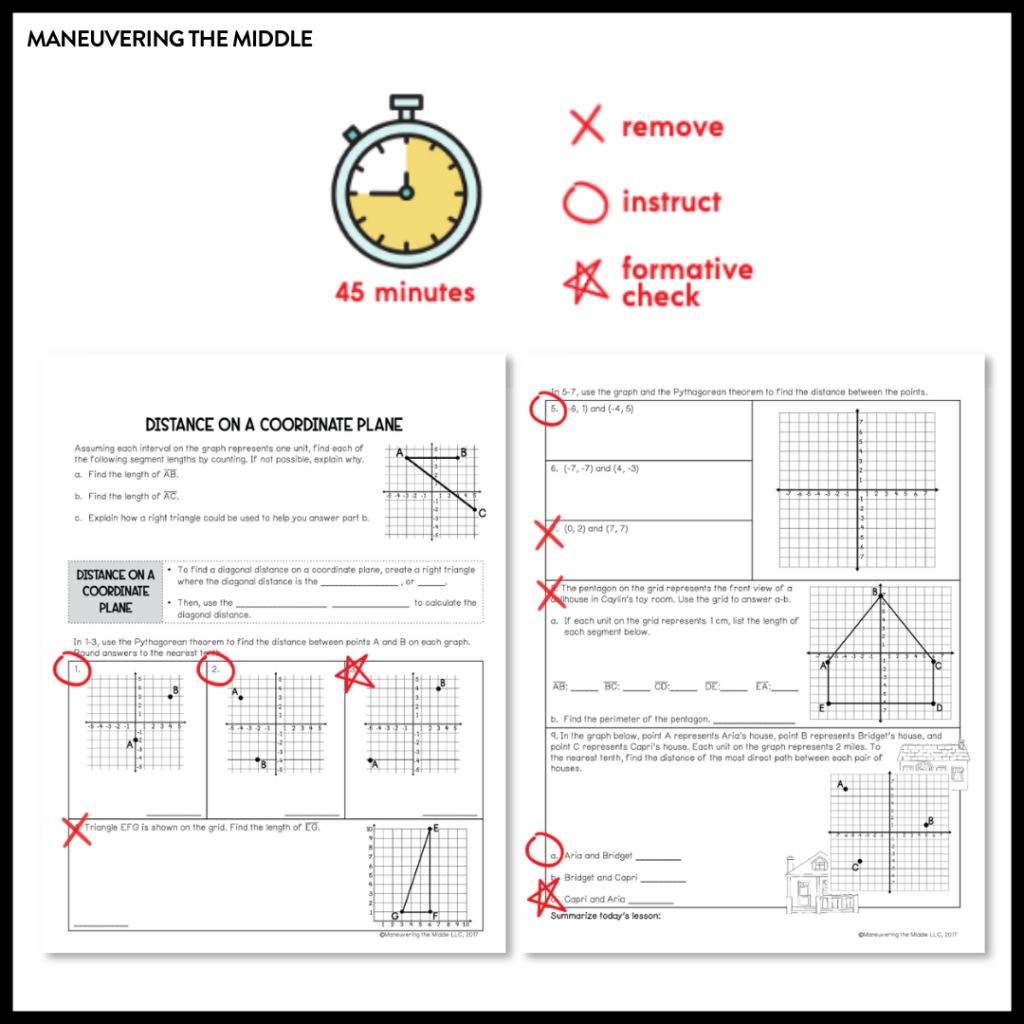
The length of your class period is going to inform how much of the student handout you will be able to use for instruction. Remember, students need to practice too!
Here is an example of what you might cover in a 45 minute class period. Notice that some problems are intentionally ignored.
A 90 minute class period is going to allow more time to complete the entirety of the student handout.
Not sure which problems to choose? Use the videos as a reference. The problems that are completed in the videos are strategically chosen to cover all of the concepts introduced in the lesson.
One last thing, use the teaching slides for instruction! They give you more space to model problems using your smartboard and/or projector.
Step 3: Select Activities to Incorporate into Instruction
On our new platform, you can filter an entire unit to see all the activities included and their corresponding lesson. As you can see below, there are a variety of activity types.

All Access has two different types of activities that are included in the curriculum:
- Hands-on Activities
- Digital Activities
Hands-on activities are my personal favorite! They allow for collaboration (partners or group), engagement, and math discourse. The different types of activities meet different learning needs.
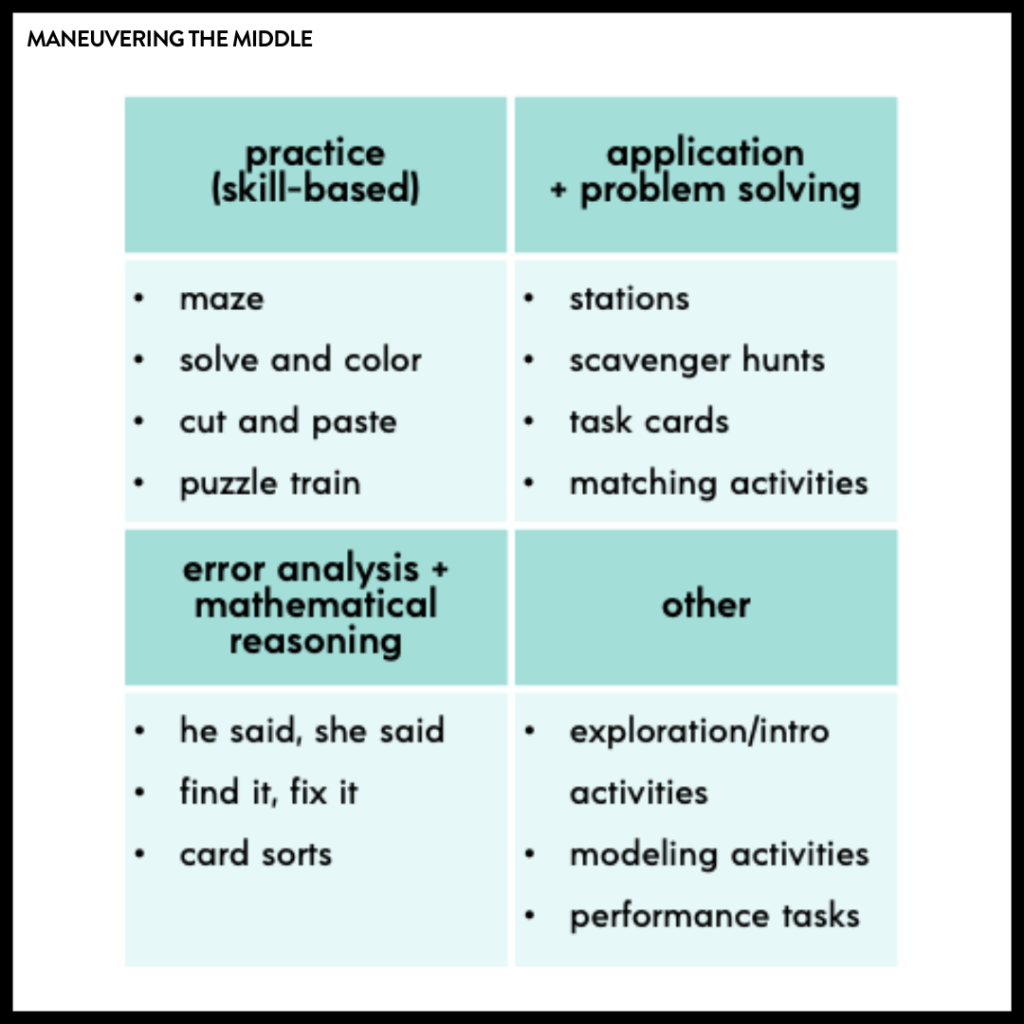
Digital activities are perfect for other needs. They are going to be assigned through technology and be completed independently. Consider assigning an activity of this nature as a station, rotation, or when pulling small groups.
The amount of activities you are able to assign are going to depend on the length of your class periods. I never was able to implement all of the activities provided in a unit, but I appreciated that I had so many options!
Step 4: Assess Daily
Backwards planning is a great practice, so maybe this step should be step 1! Either way, I am going to recommend having something you collect (either physically or by circulating) to see if students mastered the lesson’s concept.
As I mentioned earlier, you can do this by checking a specific problem on the student handouts, collecting the independent practice, or checking the activity as a class. There are many ways to provide feedback to students, so check out this post for more ideas.
Make lesson planning a breeze and get an All Access Math Subscription here!
How 3 Different Teachers Use the Student Handouts
“The first example provided is always a real-world scenario to introduce the lessons, so I have the kids work in groups to complete it. I also have them add anything they are noticing and wondering. Next, I will complete the first 3 examples as a whole class and add my own thought-provoking questions. Then, I will have the kids complete an example on their own (I select one similar to the first 3) and go over the problem. The remaining questions students have the choice of working with their row or independently. As I monitor, I pull 2-4 kids that I see need to work with me in a small group for 5-7 minutes to get them going. Then we share our answers with explanations to support the answers.”
– Dr. Brown
“I project the slides presentations of the notes on my smart screen and fill in the blanks or work out problems with students while incorporating student volunteers for answers or even to work out problems. After we complete a few as a whole group, I then ask students to work in partners to complete a few examples, then we review those on the board. After this, I pick one question from the notes to be their “exit ticket” that they must complete independently before they can move on to the practice page.”
– Ashton
“I make a 3-hole punched packet of the handouts. Students mostly discover the vocabulary by working through examples from the handout while at the whiteboard. Then, as a class we consolidate and rework selected examples from the handout. The handout examples work well with the BTC technique.”
– Mary
How 2 Different Teachers Use the Activities
“I love using the activities, such as the task cards, stations, & scavenger hunts that have the students get up out of their seat and moving around. I post the task cards/stations in the hallway and pair my students up with partners who will learn from one another (whether it be a semi-high student & semi-low student, high & medium) then I pair my lower students together so that I can work with them more to help fill any gaps. I use the performance task activities with my honors students and I typically make a game out of it, such as Trashket-ball, the unfair game, jeopardy, etc.”
– Kelly
“I find these as great resources for students when we need to back up and retract or gain extra practice. I also use them as “choice” activities when I need time to retract small groups of students.”
– Kerry
What do you do to plan your lesson? How are you using the new platform?